
如何自己成功搭建一个SSM框架的WEB项目
工作中我们或多或少都需要自己搭建一个框架,现在常见的Java开源框架组合方式主要为:SSH,spring+springMVC+JDBC,SSM。
其中SSM目前无论是培训机构培训亦或是招聘。都会将会使用SSM框架作为一个重要能力来作为培训或是招聘的重要目标之一,下面我将自己自学时搭建的一个SSM项目分享出来,供初学者参阅。
1.第一步,我们需要搭建好自己的开发环境(IDE) 笔者使用的是myeclipse+tomcat+mysql
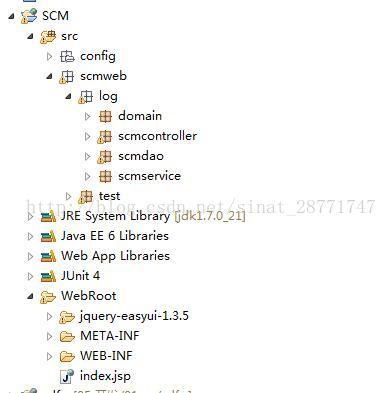
2.第二步创建一个web工程 工程名自定义,创建好了之后按照MVC设计模式创建好所有的包或文件夹(domain用于存放javabean对象,config用于存放所有的配置文件),并将SSM框架所需要的所有jar包导入到项目中

3.编写项目的配置文件(配置文件中每部分的含义,有详细的注释说明)
a.spring的配置文件application-context.xml配置文件
<?xml version="1.0" encoding="UTF-8" ?>
<beans
      xmlns="http://www.springframework.org/schema/beans"
      xmlns:xsi="http://www.w3.org/2001/XMLSchema-instance"
      xmlns:context="http://www.springframework.org/schema/context"
      xmlns:aop="http://www.springframework.org/schema/aop"
      xmlns:tx="http://www.springframework.org/schema/tx"
	  xmlns:mvc="http://www.springframework.org/schema/mvc"

      xsi:schemaLocation="

	  http://www.springframework.org/schema/beans
	  http://www.springframework.org/schema/beans/spring-beans-3.0.xsd

	  http://www.springframework.org/schema/context
      http://www.springframework.org/schema/context/spring-context-3.0.xsd

	  http://www.springframework.org/schema/aop
	  http://www.springframework.org/schema/aop/spring-aop-3.0.xsd

	  http://www.springframework.org/schema/tx
      http://www.springframework.org/schema/tx/spring-tx-3.0.xsd

      http://www.springframework.org/schema/mvc
      http://www.springframework.org/schema/mvc/spring-mvc-3.0.xsd
      ">
      <!-- 1.启用spring的注解扫描器 -->
      	<!--
      		为了加载service层中的事务能够成功被spring管理
      		需要设置spring的配置文件中的注解扫描器不扫描控制层,同时设置springMVC的配置文件不扫描service层。
      		如果不做此设置,事务无法开启
      	 -->
      <context:component-scan base-package="scmweb">
      	<context:exclude-filter type="annotation" expression="org.springframework.stereotype.Controller"/><!-- expression对应的是注解对象的全类名,而不是开发人员创建的控制层的全类名 -->
      </context:component-scan>
      <!-- 2.配置数据源 -->
      <bean class="org.springframework.beans.factory.config.PropertyPlaceholderConfigurer">
      	<property name="locations">
      		<value>classpath:config/jdbc.properties</value>
      	</property>
      </bean>
      <bean id="c3p0datasource" class="com.mchange.v2.c3p0.ComboPooledDataSource"  destroy-method="close">
      	<property name="driverClass" value="${jdbc.driverClassName}"></property>
      	<property name="jdbcUrl" value="${jdbc.url}"></property>
      	<property name="user" value="${jdbc.username}"></property>
      	<property name="password" value="${jdbc.password}"></property>
      </bean>
      <!-- 3.配置mybatis相关的东西 -->
      <!-- 3.1 配置mybatis核心sqlsessionfactory -->
      <bean name="sqlsessionfactory" class="org.mybatis.spring.SqlSessionFactoryBean">
      	<!-- 配置mybatis的主配置文件 -->
      	<property name="configLocation" value="classpath:config/mybatis.xml"></property>
      	<property name="dataSource" ref="c3p0datasource"></property>
      	<!-- 设置自动将指定包下所有的xxxMapper.xml文件引入mybatis -->
      	<property name="mapperLocations" value="classpath:scmweb/log/scmdao/*.xml"></property>
      </bean>
      <!-- 3.2 配置sqlSessionTemplate持久化模版(包含了增删查改的模版方法,
      		       如果不配置的话需要利用sqlsessionfactory来生成sqlsession对象实现对数据库的操作)
       -->
<!--       <bean name="sqlSessionTemplate"  class="org.mybatis.spring.SqlSessionTemplate"> -->
<!--       	<constructor-arg index="0" ref="sqlsessionfactory"></constructor-arg> -->
<!--       </bean> -->
      <!-- 4.配置事务相关得东西 -->
      <!-- 4.1 配置事务管理器 -->
      <bean name="transactionManager" class="org.springframework.jdbc.datasource.DataSourceTransactionManager">
      	<property name="dataSource" ref="c3p0datasource"></property>
      </bean>
      <!-- 4.2 配置事务的通知  配置为那种类型的方法加上事务-->
      <tx:advice id="tx" transaction-manager="transactionManager">
      	<tx:attributes>
      		<tx:method name="save*" propagation="REQUIRED" rollback-for="Exception"/><!-- 设置了rollback-for属性  那么只要出现异常(无论是否被手动捕获)都会回滚 -->
      		<tx:method name="update*" propagation="REQUIRED"/>
      		<tx:method name="insert*" propagation="REQUIRED"/>
      		<tx:method name="*"  propagation="SUPPORTS"/>
      	</tx:attributes>
      </tx:advice>
      <!-- 4.3 配置事务的切面 -->
      <aop:config>
      	<aop:pointcut id="acut"  expression="execution(* scmweb.log.scmservice.*.*(..))" />
      	<aop:advisor advice-ref="tx" pointcut-ref="acut"/><!-- 这里应该是用pointcut-ref属性  而不是pointcut关联切入点 -->
      </aop:config>

    <!--
    	配置mybatis的转换器,
  		目的:通过该配置,可以使得mybatis.xml文件中不必再关联实体映射配置文件(xxxMapper.xml)了,
  			并最终实现了dao层只需要 接口+xxxMapper.xml配置文件
		原理:对于在basePackage设置的包(包括子包)下的接口类,扫描所有xxxMapper.xml文件,如果某个文件的名称空间是该接口的全名,
				那么存在与名称空间相同的接口将被转换成spring的BEAN,在调用 的地方通过@Autowired方式将可以注入接口实例,
				我们在service实现层调用dao接口的方法时,则会自动将接口的全类名当作名称空间,方法名当作sql语句的id值,来执行
				对应的sql语句,并返回相应结果(因此daoimpl层就没有作用了)
		结束配置之后 3.2步便可以不再配置了
	-->
		<bean class="org.mybatis.spring.mapper.MapperScannerConfigurer">
<!-- 		<property name="sqlSessionFactory" ref="sqlsessionfactory" /> 该配置不用手动配,否则会报错,spring底层会自动注入-->
			<property name="basePackage" value="scmweb.log.scmdao"/>
		</bean>


</beans>
b.jdbc.property配置文件
jdbc.driverClassName=com.mysql.jdbc.Driver
jdbc.url=jdbc:mysql://localhost:3306/scm?useUnicode=true&characterEncoding=UTF-8
jdbc.username=root
jdbc.password=root
c.mybatis.xml配置文件
<?xml version="1.0" encoding="UTF-8"?>
<!DOCTYPE configuration PUBLIC "-//mybatis.org//DTD Config 3.0//EN"
"http://mybatis.org/dtd/mybatis-3-config.dtd">
<configuration>
	<typeAliases>
		 <!--
		 	通过package标签设置实现了将某一个包下的所有的实体类都以简单类名作为别名的设置,
		 	这样避免了分别为每一个实体类设置别名的麻烦(配置完成之后,xxxMapper.xml中不用再写全类名了直接写别名即可)
		  -->

		 <package name="scmweb.log.domain"/>
 	</typeAliases>

 	<!-- 这种方式在这里引入 xxxMapper.xml文件比较麻烦,且有多少个映射文件就要引入多少次
 		为了解决这个事情,可以在sqlSessionFactory的配置中,设置扫描放置xxxMapper.xml文件的包
 		这样可以自动扫描包下面的所有实体映射文件
 	-->
<!-- 	<mappers>  -->
<!-- 			<mapper resource="scmweb/log/domain/emploeemapper.xml"/>  -->
<!--  	</mappers> -->
</configuration>
d.springMVC.xml配置文件
<?xml version="1.0" encoding="UTF-8"?>
<beans
      xmlns="http://www.springframework.org/schema/beans"
      xmlns:xsi="http://www.w3.org/2001/XMLSchema-instance"
	  xmlns:mvc="http://www.springframework.org/schema/mvc"
	  xmlns:context="http://www.springframework.org/schema/context"
      xsi:schemaLocation="

	  http://www.springframework.org/schema/beans
	  http://www.springframework.org/schema/beans/spring-beans-3.0.xsd

      http://www.springframework.org/schema/mvc
      http://www.springframework.org/schema/mvc/spring-mvc-3.0.xsd

	  http://www.springframework.org/schema/context
      http://www.springframework.org/schema/context/spring-context-3.0.xsd
      ">
      <!-- 设置annotation-driven注解之后,便支持了返回json格式数据到前台页面 -->
      <mvc:annotation-driven/>
      <context:component-scan base-package="scmweb">
<!--       	<context:include-filter type="annotation" expression="org.springframework.stereotype.Controller"/> -->
      	<context:exclude-filter type="annotation" expression="org.springframework.stereotype.Service"/>
      </context:component-scan>
      <!-- 映射器 与xml形式的解析器不一样-->
<!--       <bean class="org.springframework.web.servlet.mvc.annotation.DefaultAnnotationHandlerMapping.class"></bean> -->

      <!-- 适配器 与xml形式的解析器不一样-->
      <bean class="org.springframework.web.servlet.mvc.annotation.AnnotationMethodHandlerAdapter"></bean>

       <!-- xml版的视图解析器和注解版的视图解析器是一样的 -->
      <bean class="org.springframework.web.servlet.view.InternalResourceViewResolver">
      	<!-- 由于这里是为了视图通过逻辑地址访问,因此这里视图解析器为必选配置 -->
      	<!-- 配置路径前缀 -->
      	<property name="prefix" value="/WEB-INF/view/"></property>
      	<!-- 配置路径后缀 -->
      	<property name="suffix" value=".jsp"></property>
      </bean>


<!--
	当 springMVC配置文件中  通过注解引入了spring的配置文件时,则web.xml文件中便可以不配置spring的xml配置文件了
	<import resource="classpath:config/application-context.xml"/>
-->
</beans>
e.web.xml配置文件中需要配置spring和springMVC的相关内容
<?xml version="1.0" encoding="UTF-8"?>
<web-app version="3.0"
	xmlns="http://java.sun.com/xml/ns/javaee"
	xmlns:xsi="http://www.w3.org/2001/XMLSchema-instance"
	xsi:schemaLocation="http://java.sun.com/xml/ns/javaee
	http://java.sun.com/xml/ns/javaee/web-app_3_0.xsd">
  <display-name></display-name>
  <welcome-file-list>
    <welcome-file>index.jsp</welcome-file>
  </welcome-file-list>
  <!-- 配置spring -->
  <listener>
  		<listener-class>org.springframework.web.context.ContextLoaderListener</listener-class>
  </listener>
  <!-- 当 springMVC配置文件中  通过注解引入了spring的配置文件时,则可以配置spring的xml配置文件-->
  <context-param>
		<param-name>contextConfigLocation</param-name>
		<param-value>classpath:config/application-context.xml</param-value>
  </context-param>

  <!-- 配置springMVC -->
  <servlet>
  	<servlet-name>DispatcherServlet</servlet-name>
  	<servlet-class>org.springframework.web.servlet.DispatcherServlet</servlet-class>
  	<init-param>
  		<param-name>contextConfigLocation</param-name>
  		<param-value>classpath:config/springMVC.xml</param-value><!-- 该配置文件一定是包含springMVC所有属性配置得配置文件 -->
  	</init-param>
  </servlet>
  <servlet-mapping>
  	<servlet-name>DispatcherServlet</servlet-name>
  	<url-pattern>*.action</url-pattern>
  </servlet-mapping>
    <filter>
  	<filter-name>CharacterEncodingFilter</filter-name>
  	<filter-class>org.springframework.web.filter.CharacterEncodingFilter</filter-class>
  	<init-param>
  		<param-name>encoding</param-name>
  		<param-value>UTF-8</param-value>
  	</init-param>
  </filter>
  <filter-mapping>
  	<filter-name>CharacterEncodingFilter</filter-name>
  	<url-pattern>/*</url-pattern>
  </filter-mapping>
  <!-- 配置springMVC结束 -->


</web-app>
配置到这一步之后,会发现,现在需要手动创建javabean实例、dao层的接口以及javabean对应表格的mapper配置文件,因此,这里用到了一个mybatis逆向工程的插件,用于自动生成上述三个部分
4.配置mybatis的逆向工程插件
a.首先需要在myeclipse的安装目录中添加逆向工程
首先找见安装目录中的MyEclipse 10下创建add-pluginsmybatis-generater文件夹,然后将逆向工程压缩包解压之后的两个文件夹放到改目录下
D:myprogram1myeclipse10MyEclipse 10add-pluginsmybatis-generater
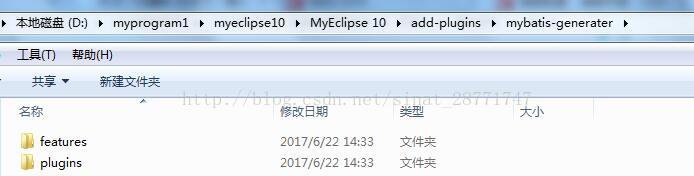
其次在myeclipse的安装目录D:myprogram1myeclipse10MyEclipse 10dropins下创建mybatis.link文件(后缀为.link),文件内容为:path=D:\myprogram1\myeclipse10\MyEclipse 10\add-plugins\mybatis-generater
重启myecplise,将中generatorConfig.xml添加到项目中
b.generatorConfig.xml配置文件
<?xml version="1.0" encoding="UTF-8"?>
<!DOCTYPE generatorConfiguration
  PUBLIC "-//mybatis.org//DTD MyBatis Generator Configuration 1.0//EN"
  "http://mybatis.org/dtd/mybatis-generator-config_1_0.dtd">
<!--
	mybatis的逆向工程插件,用于帮助开发人员自动生成数据库中指定表格所对应的:
	javabean、xxxMapper.xml文件(javabean与表格的映射文件)和dao层的接口类
	这样开发人员不用自己去一张一张的建表格对应的各种类和配置文件了。

	当配置结束之后,右击文件名会有generator Mybatis/Ibatis artifacts选项   点击即可顺利运行
	 执行结果为:数据库中一张表对应:一个javabean,一个dao接口对象,一个xxxMapper.xml文件
 -->
<generatorConfiguration>
<!--
	<properties resource="conn.properties" />
	  -->
	  <!-- 处理1 -->
	 <classPathEntry location="E:mybatismysql-connector-java-5.1.7-bin.jar"/>
	<!-- 指定运行环境是mybatis3的版本 -->
	<context id="testTables" targetRuntime="MyBatis3">

		<commentGenerator>
		<!-- 是否取消注释 -->
			<property name="suppressAllComments" value="true" />
			 <!-- 是否生成注释代时间戳 -->
			<property name="suppressDate" value="true" />
		</commentGenerator>
		<!-- 处理2   jdbc 连接信息 -->
		<jdbcConnection driverClass="com.mysql.jdbc.Driver"
			connectionURL="jdbc:mysql://localhost:3306/scm?useUnicode=true&characterEncoding=UTF-8" userId="root" password="root">
		</jdbcConnection>

        <!--处理3   targetPackage指定模型(即表所对应的实体类)生成在哪个包 ,targetProject指定项目的src目录,-->
		<javaModelGenerator targetPackage="scmweb.log.domain"
			targetProject="SCM/src">
			<!-- 去除字段前后空格 -->
			<property name="trimStrings" value="false" />
		</javaModelGenerator>
		<!--处理4   配置xxxMapper.xml文件生成到项目中哪个包中 -->
		<sqlMapGenerator targetPackage="scmweb.log.scmdao"
			targetProject="SCM/src" />
		<!-- 处理5   配置dao接口生成信息(由mybatis逆向工程生成的dao接口类全是以Mapper结尾的)-->
		<javaClientGenerator type="XMLMAPPER" targetPackage="scmweb.log.scmdao" targetProject="SCM/src" />

		<!-- 指定要为数据库中哪些表格生成对应的接口对象和实体类(javabean)以及对应的xxxMapper.xml文件
			切忌一张表格只能自动生成一次,如果多次生成的话,会造成生成的事物内部属性一直重复
		-->
		<table tableName="account" domainObjectName="Account"/>

		<table tableName="supplier" domainObjectName="Supplier"/>
	</context>
</generatorConfiguration>
当配置结束之后,右击文件名会有generator Mybatis/Ibatis artifacts选项 点击即可顺利运行
执行结果为:数据库中一张表对应:一个javabean,一个dao接口对象,一个xxxMapper.xml文件
5.如果项目搭建好了之后POST表单提交的数据出现乱码,可以查看我得另一篇日志SSM框架Jsp页面POST提交的中文数据保存到数据库变成乱码问题的分析
6.项目源码地址:https://gitee.com/willbeahero/ssmproject
- 上一篇:没有了
- 下一篇:没有了