vue+vueRouter+vuex+vux(微信项目开发框架)
用vue+vueRouter+vuex+vue编写的单页面手机端项目框架
非常适合H5项目···
咱们开始吧!
main.js
import Vue from "vue"
import Vuex from "vuex"
import FastClick from "fastclick"
import {WechatPlugin, AjaxPlugin, LoadingPlugin, ToastPlugin, AlertPlugin} from "vux"
import router from "./router"
import App from "./App"
/**
 * 加载插件
 */
Vue.use(Vuex)
Vue.use(WechatPlugin)
Vue.use(AjaxPlugin)
Vue.use(LoadingPlugin)
Vue.use(ToastPlugin)
Vue.use(AlertPlugin)
/**
 * 设置vuex
 */
const store = new Vuex.Store({})
store.registerModule("vux", {
  state: {
    loading: false,
    showBack: true,
    title: "",
    number: ""
  },
  mutations: {
    updateLoading (state, loading) {
      state.loading = loading
    },
    updateShowBack (state, showBack) {
      state.showBack = showBack
    },
    updateTitle (state, title) {
      state.title = title
    },
    updateNumber (state, number){
      let num = ""
      if(number <= 0){
        state.number = num
      }else {
        num = number.toString()
        state.number = num
      }

    }
  }
})
/**
 * 公用组件
 */
Vue.prototype.updateTitle = function (value) {
  this.$store.commit("updateTitle", value)
}
/**
 *  日志输出开关
 */
Vue.config.productionTip = true
/**
 *  点击延迟
 */
FastClick.attach(document.body)
/**
 *  创建实例
 */
new Vue({
  store,
  router,
  render: h => h(App)
}).$mount("#app-box")
import Vue from "vue"
import VueRouter from "vue-router"
/**
 *  加载模块
 */
Vue.use(VueRouter)
/**
 *  路由配置
 */
const router = new VueRouter({
  base: __dirname,
  likActiveClass: "link-active",
  routes: [
    {
      path: "/init",
      name: "init",
      component: resolve => require(["../components/init.vue"], resolve),
      children: [
        {
          path: "personal/userInfo",
          name: "userInfo",
          component: resolve => require(["../components/personal/userInfo.vue"], resolve),
          meta: {title: "主页"}
        },
        {
          path: "home",
          name: "home",
          component: resolve => require(["../components/home.vue"], resolve),
          meta: {title: "主页"}
        }
      ]
    },
    {
      path: "/",
      name: "login",
      component: resolve => require(["../components/login.vue"], resolve),
      meta: {title: "登录"}
    }
  ]
})

/**
 *  路由出口
 */
export default router
index.vue
<template>
  <div id="Init">
    <top class="top"></top>
    <transition>
      <router-view></router-view>
    </transition>
    <bottom></bottom>
  </div>
</template>

<script>
  import Top from "./layouts/top.vue"
  import Bottom from "./layouts/bottom.vue"
  export default {
    components: { Top, Bottom}
  }
</script>

<style>
  html, body {
    height: 100%;
    width: 100%;
    overflow-x: hidden;
  }
  #Init .top{margin-bottom: 46px;}
</style>
里面的top和bottom是自己写的组件,可以删掉(还是贴上代码吧!)
top.vue
<template>
  <div id="Top">
    <x-header slot="header" style="width:100%;position:absolute;left:0;top:0;z-index:100;"
              :left-options="{showBack: showBack, backText: ""}" :right-options="{showMore: true}"
              @on-click-more="showMenus = true">{{title}}
    </x-header>

    <div v-transfer-dom>
      <popup v-model="showMenus" position="right">
        <div style="width:200px;">
          <group>
            <cell v-for="(menu,value) in menuList" :title="menu.title" :value="menu.value"
                  @click.native="goToUrl(menu.url)" :class="menu.class" v-bind:key="menu.key"></cell>
          </group>
        </div>
      </popup>
    </div>
  </div>
</template>

<script>
  import {mapState} from "vuex"
  import {XHeader, TransferDom, Popup, Group, Cell, cookie} from "vux"

  export default {
    directives: {
      TransferDom
    },
    components: {
      XHeader,
      Popup,
      Group,
      Cell
    },
    computed: {
      ...mapState({
        showBack: state => state.vux.showBack,
        title: state => state.vux.title
      })
    },
    data () {
      return {
        menuList: [
          {title: "userInfo", value: "", url: "/userInfo"},
          {title: "", value: "userInfo", url: "/userInfo", class: "menu"},
          {title: "userInfo", value: "", url: "/userInfo"},
          {title: "", value: "userInfo", url: "/userInfo", class: "menu"}
        ],
        showMenus: false
      }
    },
    methods: {
      goToUrl(path) {
        if (path) {
          console.log(path)
        }
        let vue = this
      }
    }
  }
</script>
<style>
  *{font-size: 14px}
  #Top .vux-header-title {
    font-size: 16px;
  }
  #Top .menu {
    margin-right: 70px;
  }
  #Top .menu div {
    color: #000;
  }
  #Top .menu:before {
    right: -70px;
  }
</style>
bottom.vue
<template>
  <div>
    <tabbar>
      <tabbar-item selected link="/init/home">
        <img slot="icon" src="static/bottom/icon_nav_button.png">
        <span slot="label">home</span>
      </tabbar-item>
      <tabbar-item show-dot>
        <img slot="icon" src="static/bottom/icon_nav_msg.png">
        <span slot="label">Message</span>
      </tabbar-item>
      <tabbar-item selected link="/init/personal/userInfo">
        <img slot="icon" src="static/bottom/icon_nav_article.png">
        <span slot="label">userInfo</span>
      </tabbar-item>
      <tabbar-item badge="2">
        <img slot="icon" src="static/bottom/icon_nav_cell.png">
        <span slot="label">News</span>
      </tabbar-item>
    </tabbar>
  </div>
</template>

<script>
  import { Tabbar, TabbarItem, Group, Cell } from "vux"

  export default {
    components: {
      Tabbar,
      TabbarItem,
      Group,
      Cell
    }
  }
</script>
<style>

</style>
这两个组件在init里面用到了
init.vue
<template>
  <div id="Init">
    <top class="top"></top>
    <transition>
      <router-view></router-view>
    </transition>
    <bottom></bottom>
  </div>
</template>

<script>
  import Top from "./layouts/top.vue"
  import Bottom from "./layouts/bottom.vue"
  export default {
    components: { Top, Bottom}
  }
</script>

<style>
  html, body {
    height: 100%;
    width: 100%;
    overflow-x: hidden;
  }
  #Init .top{margin-bottom: 46px;}
</style>
这段代码里面有个
<transition>
  <router-view></router-view>
</transition>
也就是说,后面的页面到加载到
<router-view></router-view>
比如http://····················#/init/personal/userInfo 路径里面有init
好了上述是框架主要代码了,了解vue的一眼就懂了。我也是做个笔记而已。
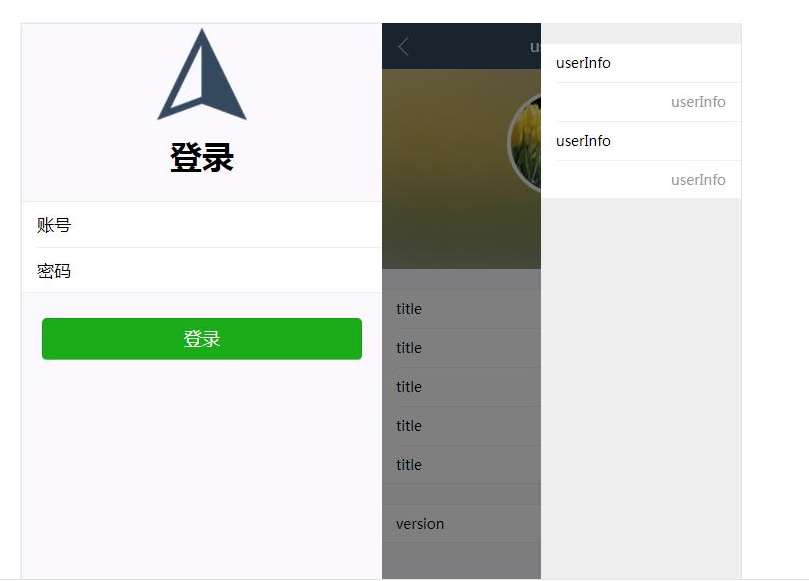
附上框架效果图
最后附上git地址(这个很重要) https://github.com/Apache-Ra/vue-wechat-demo.git (不定期更新)
不理解的地方请留意
声明:该文观点仅代表作者本人,入门客AI创业平台信息发布平台仅提供信息存储空间服务,如有疑问请联系rumenke@qq.com。
- 上一篇:没有了
- 下一篇: localStorage的高级操作写法


